Reflow using Toaster Oven
In the lab, there are two options that can be used for reflow purposes: the T-962A and the toaster oven. For the T-962A, go to the OPEnS Staff and User Resources. This page will go over how to use the toaster oven to reflow. It's important to note that the entire document should be read before you begin the reflow process.
- Reflow Solder Paste
- Multimeter that measures temperature
- Timer
- Tweezers
The temperature listed on the oven does not correlate to the temperature that is measured inside of the oven. When reflowing, it's important that the board is at the specified temperature above, not just the temperature on the dial. We will use the temperature function on the multimeter to read the temperature inside of the oven.
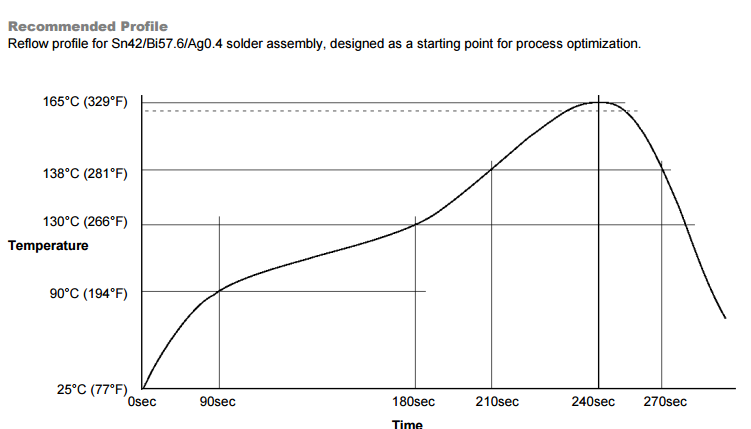
The reflow graph below shows the curve that you should aim for while reflowing. Note that due to the physical limitations of the oven, some of the temperature measurements are difficult to achieve at the specified time.
A few key points are:
- 90 seconds: The temperature should be anywhere between 75 and 90 degrees Celsius. If not, turn up the heat by an increment.
- 240 seconds: The temperature will not rise from 138 degrees Celsius to 165 degrees Celsius in 30 seconds with the toaster oven. It's best to just wait until the temperature gets to the 165 degrees Celsius-- which will most likely be at 270 second mark.
- Apply the reflow paste to the PCB
- For an example of applying reflow paste to the Hypnos, go to the Hypnos Build Guide
- Use tweezers to place components on the PCB
- Place PCB and multimeter temperature extension into the toaster oven and close the oven door.
- Note: The toaster oven has three slots that the tray can be placed in. The middle slot is the best place to put the tray for reflow purposes.
- Set the multimeter to the temperature option
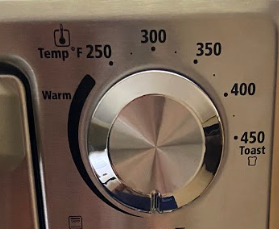
- There are three knobs for the toaster oven. Set the temperature knob to the end of the black line labelled "Warm". (shown in the figure below).
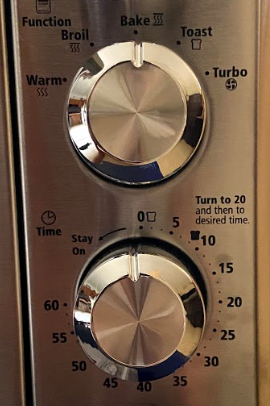
- For the function (second) knob, set it to the bake option.
- When adjusting the timer knob (last one), the oven will start heating up. Start the timer and turn the knob past the 20 minute mark. See the picture below.
- The temperature reading should be rising on the multimeter. As stated above, if the temperature at 90 seconds is lower than 75 degrees Celsius, turn up the temperature knob by one increment (i.e. If the knob is at the end of the black line, turn the knob to the 250 mark).
- Note: Increasing the temperature will most likely cause the reflow curve to shoot above the expected temperature. Be sure to adjust the knob accordingly to get as close to the graph as possible.
- The temperature should steadily keep increasing until the 180-210 second mark. Once 210 seconds has passed, turn the temperature knob to the 275 mark (dot between 250 and 300) and wait until the multimeter reads 165 degrees Celsius.
- Once it peaks, turn the temperature knob and the timer knob back to the start and open the oven door. Let the PCB and tray cool down and take it out when it reaches a cool temperature.
- Inspect the PCB for any connections that need to be redone. Use a soldering iron to fix these cold connections.