The Blue Robotics Ping Echosounder is a low cost acoustic rangefinder for underwater applications. This Arduino library allows you to communicate and gather data from a Ping device.
Ensure your device is running the latest firmware.
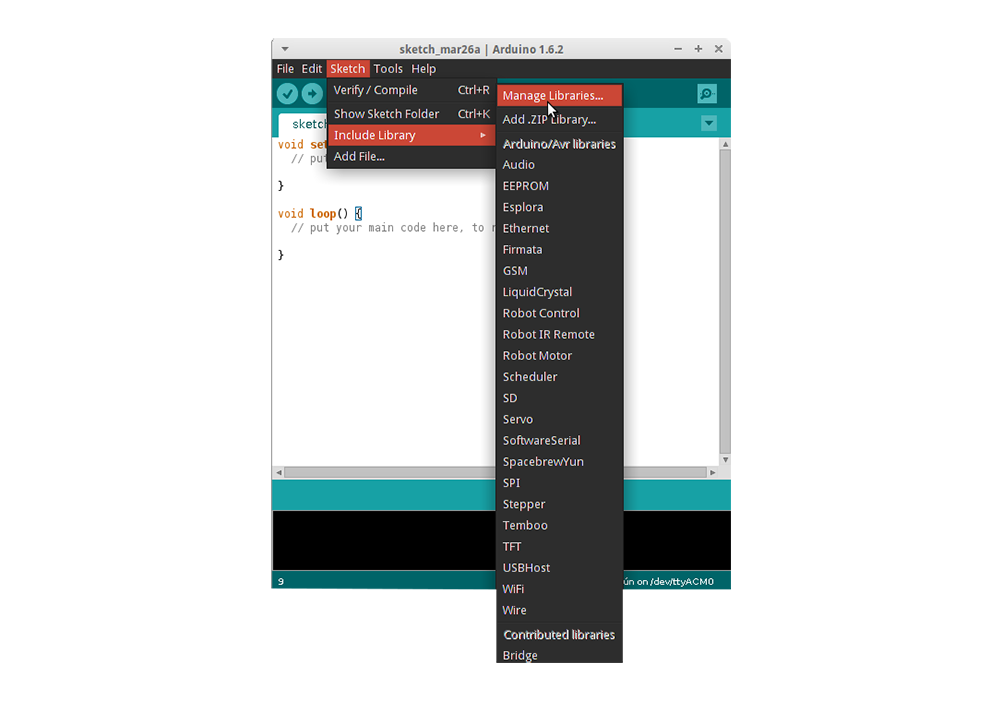
This library can be found in the Arduino Library manager. To install the library, open the Arduino IDE and navigate to library manager with the menu items: Sketch -> Include Library -> Manage Libraries. Search for Blue Robotics ping-arduino to find the library, then click Install to install it.
More information about installing Arduino libraries can be found here.
These are the recommended wiring connections to make between the Ping device and an Arduino:
| Ping | Arduino |
|---|---|
| red (5V) | 5V |
| black (Ground) | Ground |
| white (tx) | pin 9 (SoftwareSerial rx) |
| green (rx) | pin 10 (SoftwareSerial tx) |
You can begin using your Ping with an Arduino by uploading the ping1d-simple example in the examples folder.
The built in HardwareSerial port is used to print out data from the ping device over the Arduino's usb port. To view the data, open the Arduino IDE Serial monitor, and set the baudrate to 115200.
The examples use the SoftwareSerial library to communicate with the Ping device, which allows flexibility for the rx/tx pin assignments on the Arduino. The examples use pins 10 and 9. The SoftwareSerial library can only communicate with the Ping device at 9600 baud. If you are using a board with more than one HardwareSerial port, like the Arduino MEGA, you may use the second serial port to communicate with a Ping device at 115200 baud, as in ping1d-simple-mega.ino.
The Ping1D object is created with a reference to the Serial object that the Ping device is connected to.
#include "SoftwareSerial.h"
#include "ping1d.h"
SoftwareSerial pingSerial { 9, 10 };
Ping1D myPing { pingSerial };
To begin communicating with the Ping device, first initialize the serial port with begin(<baudrate>). Then, you can initialize the Ping device with initialize(). initialize() will return false if the the device communication fails.
void setup {
    // Use 9600 bits per second to communicate with the Ping device
    pingSerial.begin(9600);

    // Use built in Serial port to communicate with the Arduino IDE Serial Monitor
    Serial.begin(115200);

    // wait until communication with the Ping device is established
    // and the Ping device is successfully initialized
    while (!myPing.initialize()) {
        Serial.println("Ping device did not initialize");
    }

    Serial.println("Ping device initialized!)
}To get the distance and confidence measurements from the Ping device, call update() to request a new distance measurement from the device before calling distance() and confidence() to use the measurement values. The values returned by the distance() and confidence() functions will not change until update() is called again.
void loop() {
    while (!myPing.update()) {
        Serial.println("Ping device update failed");
    }

    Serial.println("Got an update!");
    Serial.print("distance: ");
    Serial.println(myPing.distance());
    Serial.print(" confidence: ");
    Serial.println(myPing.confidence());
}The Ping communicates with the Ping communication protocol.
Call request(<message id>) to request a message from the ping device. The message ids are also placed in the Ping1DNamespace for convenience. To use the values from the response, use the Ping1D class accessors matching the message field names (eg. distance() and speed_of_sound()).
void loop() {
    while (!myPing.request(Ping1DNamespace::Processor_temperature)) {
        Serial.println("Failed to get processor temperature");
    }
    Serial.println("Got an update!");
    Serial.print("processor temperature: ");
    Serial.println(myPing.processor_temperature());
}
See the doxygen documentation for a full description of the available classes and functions.

