Quickstart
-
You'll need to have SteamVR installed and a SteamVR compatible headset. If you have a VR HMD it's probably compatible. You can download SteamVR here: https://store.steampowered.com/app/250820/SteamVR/
-
We also recommend developers opt-in to SteamVR Beta. There is a bug with reloading actions in the current default version of SteamVR. Please opt-in to SteamVR Beta for actions to reload properly
-
For developers using the source version from GitHub, you'll need the following in addition:
-
Visual Studio 2017 installed - you won't have to edit any code but it needs to be able to compile the plugin. You can get Visual Studio Community edition for free from here: https://visualstudio.microsoft.com/vs/community/
-
Make sure to add the Visual Studio C++ support during install as they are not part of the default install: https://docs.microsoft.com/en-us/cpp/build/vscpp-step-0-installation?view=vs-2017
-
The plugin can be downloaded from the Unreal Engine Marketplace: https://www.unrealengine.com/marketplace/slug/steamvr-input-for-unreal
It's also available on github. Clone the repository in your favourite client or download from our releases page here: https://github.com/ValveSoftware/steamvr_unreal_plugin/releases
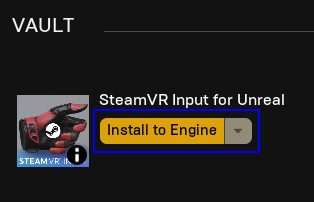
Look for "SteamVR Input for Unreal" in the Unreal Engine Vault of the Epic launcher and install to the Engine version of your choice. The plugin is compatible with UE 4.15 and above:
If your project is a Blueprint only project, you'll need to create a C++ class so we can install the plugin. Do this by going to the File Menu -> New C++ Class. Then select GameModeBase and add the file. It doesn't matter what you call it or where you put it. That will open a Visual Studio solution, go ahead and close that.
Now you can create a Plugins directory in your Game folder next to the .uproject. Copy the SteamVRInput folder into that Plugins folder (or clone this repo to that location). Now close your project and reopen it to get it to detect the plugin. When it asks you if you want to build the missing DLLs say yes.
SteamVR Input allows you to create bindings to actions on a per controller basis. To streamline this from inside Unreal Engine we've added a set of keys for the currently popular PC VR controllers. You can add bindings for more controller types by manually editing the JSON files.
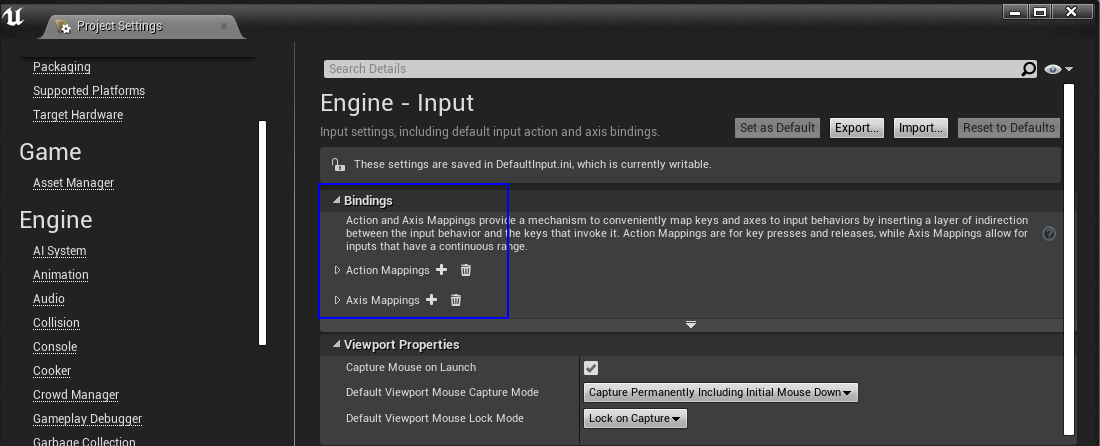
In the Input section of your Project Settings you can add actions and axis like you normally would. Then bind individual VR controllers to those actions/axis.
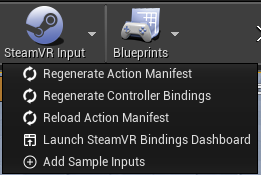
Once done click the SteamVR Input Toolbar and select Regenerate Action Manifest to create the SteamVR action manifest (action definitions). Then select Regenerate Controller Bindings to create json mapping files for each individual controller (action bindings). Finally select Reload Action Manifest to load the generated files into SteamVR

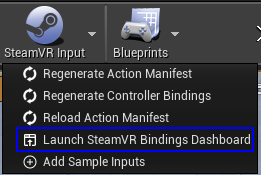
To further configure your bindings you can either manually edit the json files or you can go to the SteamVR Input toolbar menu and select Launch SteamVR Bindings Dashboard
We've created a sample project if you want to quickly test the features of the plugin. You can download it from here:
https://github.com/ValveSoftware/steamvr_unreal_plugin/wiki/sample/SteamVRInputPlugin.zip
Unzip the package in a local directory and double-click on the .uproject file. During first run, it should ask your for which version of the Engine you wnat to open the project on, select an Engine version where you have installed the plugin.
You may need to click the eye in the lower right hand corner of your Content Browser and click Show Engine Content (and Show Plugin Content if you are using the github source version) to get access to that folder.

We've created some sample content to show you how to work with SteamVR Input actions and Skeletal Input. You can find two maps in SteamVR Input Content/Sample/Maps

-
SteamVRHands_SampleMapshows sample interactions with the SteamVR hand skeleton (left and right independent hands). -
UEHands_SampleMapshows sample interactions with the hand that comes with the Unreal VR Template from epic (mirrored left hand).
To get this sample content to work you will need to copy the input actions to your project. We've automated this process for you in the SteamVR Input toolbar. Just click that toolbar then click Add Sample Inputs. Then Regenerate Action Manifest, Regenerate Controller Bindings, and Reload Action Manifest before hitting Play (VR Preview)!
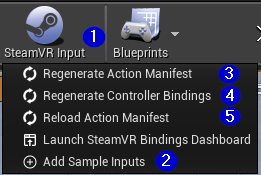
- Regenerate Action Manifest - This will OVERWRITE the list of SteamVR actions in your action manifest json (Config/SteamVRBindings/steamvr_manifest.json)
- Regenerate Controller Bindings - This will OVERWRITE the bindings for each controller type that the plugin generates for you (Config/SteamVRBindings). It will do its best to map your bindings in the Unreal Input preferences to SteamVR action bindings.
- Reload Action Manifest - This will attempt to shut down the Unreal Engine SteamVR session and reinitialize it with the latest versions of your action manifest and binding files. You should do this whenever you manually edit the JSON files.
-
Launch SteamVR Bindings Dashboard - This will open the SteamVR Binding Dashboard in your default browser. From here you can customize the bindings that we have autogenerated for you based on the current controllers you have turned on. Be sure to hit the
Replace Default Bindingbutton in the bottom right if you make changes. Otherwise it won't overwrite your binding JSON. - Add Sample Inputs - This will attempt to add sample actions and axis to your Input preferences to make our sample scene work with most of the popular VR controllers.
- PACKAGED BUILDS in UE 4.24 and above Copy the Config/SteamVRBindings folder and all the files here to your build package under {BuildType/WindownsNoEditor}/{ProjectName}/Config/SteamVRBindings
- Vector2 Actions - As Unreal doesn't have a concept of a Vector2 action we auto group two vector1 actions with names that end with _X and _Y. For example, to create a mapping for MoveLeft you will need a MoveLeft_X and a MoveLeft_Y that you bind to their corresponding controller axis. See the sample inputs for an example. (SteamVR Input Menu - Add Sample Inputs)
- Controller Specific Mappings - If you create a SteamVR controller specific mapping in your input settings it will override any Motion Controller bindings when using SteamVR. The intent here is to let you maintain compatibility with other motion controller systems.
- Haptics - Haptic actions work a bit differently than the default Unreal haptic actions. To trigger haptics under SteamVR Input see the "Play SteamVR Haptic Feedback" blueprint node. For an example see the BP_MotionController blueprint in SteamVRInputContent/EpicTemplates/VRTemplate/Blueprints.
-
Input Action Keys - The
Keyparameter that comes in Input Actions does not function in the current version of the plugin. If you need this functionality for some reason please let us know in the Issues section so we can prioritize this for a future release. - Direct Key Access - With SteamVR Input you are no longer able to access the value of keys directly. You'll need to create an action and mapping to get any sort of input from motion controllers.
- Standalone Builds - There's currently an issue where running a build will crash the editor and sometimes the build if any editor processes are running. So after you make a build close the editor and wait a few minutes (or kill the editor in task manager) before running a standalone build
-
Input Debugging - As a developer we recommend you enable developer mode and input debugging in SteamVR settings. Open SteamVR Settings from the SteamVR Monitor window. Go down to the Developer tab, and check the box for
Enable debugging options in the input binding user interface.