Importing and Running USupport mobile project in Android Studio and Xcode
Use the following link to access Mobile App Usage Manual
- Make sure that Node.js and NPM is installed on your system. Download Node.js
- Clone the project with one of the following commands:
git clone https://github.com/UNICEFECAR/USupport-mobile.gitor
git clone [email protected]:UNICEFECAR/USupport-mobile.git- Enter inside the project directory and install the JavaScript dependencies:
cd Usupport-mobile
npm install
to install all the dependencies.
-
Configure Firebase services
- Create Firebase project
- Add Android and iOS apps to the Firebase project and download the respective
google-services.jsonandGoogleService-Info.plistfiles - Add the files to the project in the following locations:
android/app/google-services.jsonios/GoogleService-Info.plist
-
Open the
.env.sampleand copy it's contents. -
Create an
.env.developmentfile in the root directory of the project and paste the enviorment variables that you copied in the previous step. If you dont have the backend running, you can use the enviorment variables for the staging backend.
API_URL_ENDPOINT=https://staging.usupport.online/api
CMS_API_URL_ENDPOINT=https://staging.usupport.online/cms/api
AMAZON_S3_BUCKET=https://usupport-staging.s3.eu-central-1.amazonaws.com
WEBSITE_URL=https://staging.usupport.online
SOCKET_IO_URL=wss://staging.usupport.online
STRIPE_PUBLIC_KEY=pk_test_51MPzPVEFe7qoLe5D8bfwXpGuYvL0I98ui3P2lfM1cWoG1b0oRU8GfXBzWnXMrivdRwR7gXXngkjiNxm85PXv4B1400jL8VhSUh
If you are running the backend locally, then you need to add the AMAZON_S3_BUCKET url of the S3 bucket you created and the STRIPE_PUBLIC_KEY of the Stripe account you created.
The API_URL_ENDPOINT and CMS_API_URL_ENDPOINT should be https and not http, you can use ngrok to create a secure tunnel to your localhost. For reference use the below example
API_URL_ENDPOINT=https://<ngrok-url>.ngrok.io/api
CMS_API_URL_ENDPOINT=https://<ngrok-url>.ngrok.io/cms/api
AMAZON_S3_BUCKET=https://<bucket-name>.s3.eu-central-1.amazonaws.com
WEBSITE_URL=https://<ngrok-url>.ngrok.io
SOCKET_IO_URL=wss://<ngrok-url>.ngrok.io
STRIPE_PUBLIC_KEY=pk_test_51MPzPVEFe7qoLe5D8bfwXpGuYvL0I98ui3P2lfM1cWoG1b0oRU8GfXBzWnXMrivdRwR7gXXngkjiNxm85PXv4B1400jL8VhSUh
The CODEPUSH_ANDROID_DEPLOYMENT_KEY and CODEPUSH_IOS_DEPLOYMENT_KEY enviorment variables are used for over-the-air updates, which is not required for local development. You can leave them empty or with the placeholder value.
- Install the Expo CLI globally:
npm install -g expo-cli- Run the following command to start the development server:
npm start- Install Android Studio: Make sure you have Android Studio installed on your system. You can download it from the official website and follow the installation instructions.
-
Launch Android Studio on your system.
-
Import the project: In Android Studio, select "Open an existing Android Studio project" from the welcome screen. Navigate to the root directory of the project and open the
androidfolder. Android Studio will import the project. -
Gradle Sync: Android Studio will start syncing the project with Gradle. Wait for the syncing process to complete. This might take a few minutes, as Android Studio downloads the necessary dependencies.
-
Configure Android SDK: Make sure you have the required Android SDK installed. If prompted, follow the on-screen instructions to download and install the necessary SDK components.
-
Once the project is successfully imported and synced, you can run it by selecting a target device or emulator from the toolbar and clicking on the "Run" button. Android Studio will build the project and launch it on the selected device or emulator.
-
In case you get an error "Unable to load script.Make sure you are either running a Metro server or that your bundle 'index.android.bundle' is packaged correctly for release", run the following command in the terminal:
adb reverse tcp:8081 tcp:8081and then reload the app on the device or emulator(by pressing "R" key in the terminal that is running the React Native server).
If you get an error saying "adb: command not found", make sure you have adb installed on your system and that it is added to your PATH environment variable. More Info
-
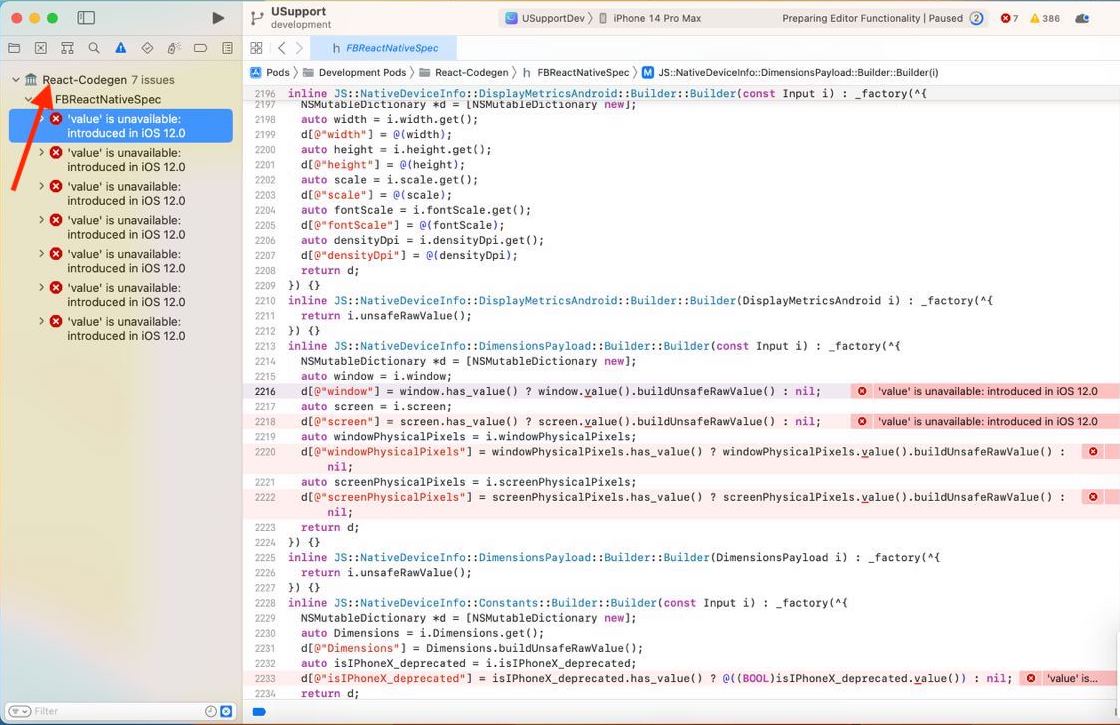
If you encounter the following error when running the app on iOS React-Codegen FBReactNativeSpec 'value' is unavailable: introduced in iOS 12.0 Follow those steps to fix it:
-
Click on the top left it say React-Codegen
-
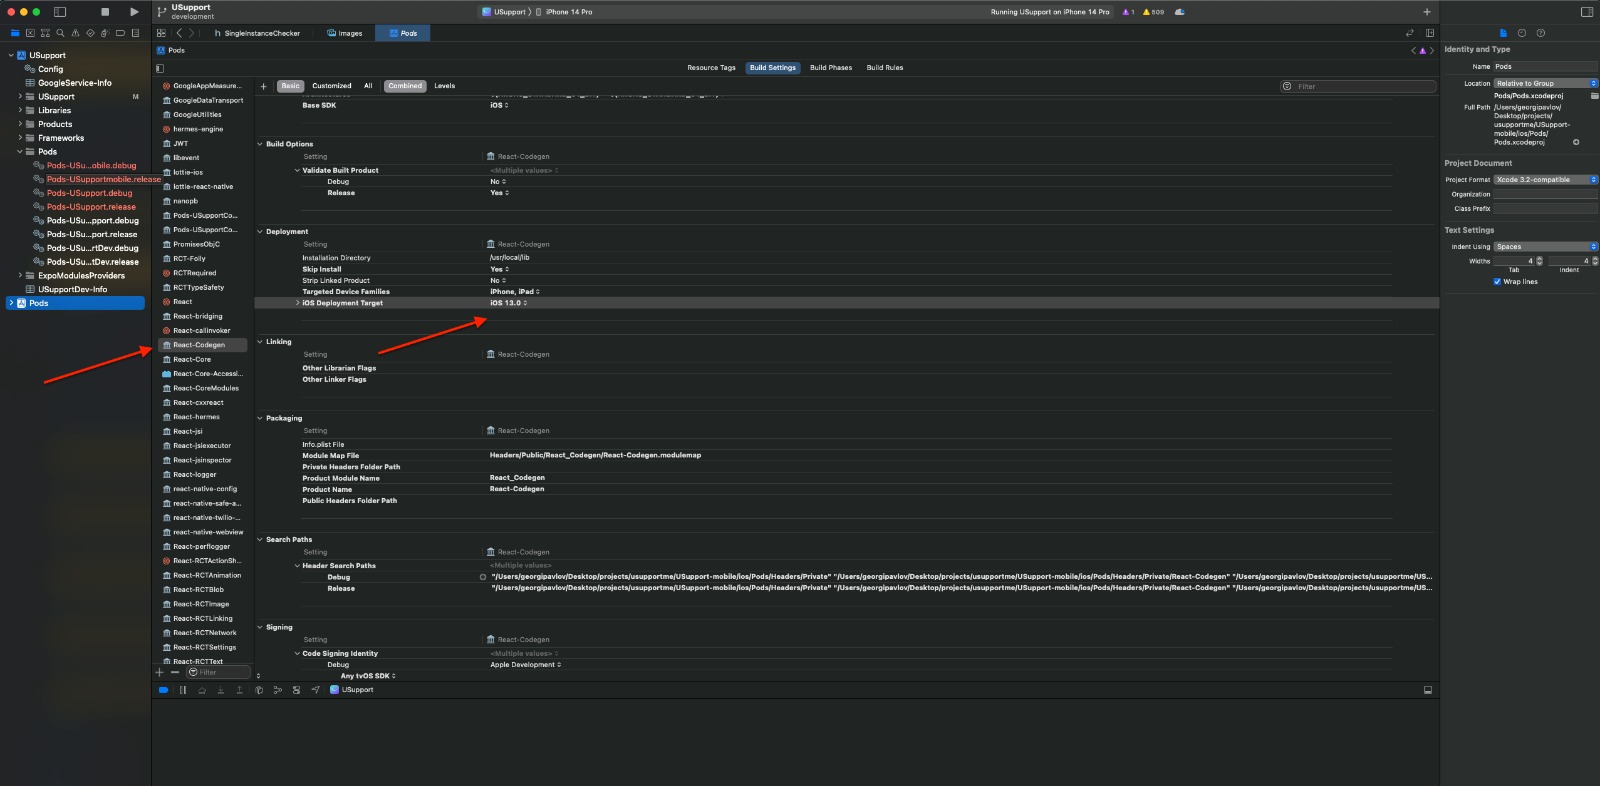
On the pane that appears find the React-Codegen Pod and click on it
-
On the right, find the iOS Deployment Target in the "Deployment" section and change it to iOS 13.0
- Make sure you have Xcode and cocoapods installed on your system. You can download it from the Mac App Store or the Apple Developer website. Note that an Apple Developer account is required to setup all the necessary certificates and provisioning profiles for running the project on a physical device. Running the project on the iOS Simulator does not require a paid Apple Developer account.
- Download Xcode
- install cocoapods
sudo gem install cocoapods- In a terminal run one of following commands to install the native dependencies:
cd ios && pod installor
npx pod-install-
Launch the Xcode app.
-
Open the project: In Xcode, select "Open another project" or "Open a project or file" from the welcome screen. Navigate to the root directory of the project and select the
USupport.xcworkspacefile. Xcode will then open the project. -
From the scheme dropdown in the toolbar(located in the top middle), open the dropdown and select the "USupport Dev" scheme.
-
Next to the scheme dropdown, open the simulators dropdown and select a simulator or a physical device to run the project on.
-
Click on the "Run" button or press Command+R to build and run the project. Xcode will compile the project, launch the chosen device or simulator, and deploy the React Native app onto it.
If you run in any permission issues run:
sudo chown -R yourusername:yourgroupname directoryname- You can reload the running app by pressing the "R" button inside of the terminal that is running the React Native server.
git commit -a -m "{commit message}"
git push
- Features
feature/{branch_name} - Bugs
bug/{branch_name} - Hotfixes
hotfix/{branch_name}
- Create:
[commit message](create a new component) - Add:
[commit message](addition to an existing component) - Fix:
[commit message](fix a bug within an existing component) - Refactor:
[commit message](refactor an existing component)