To get more comfortable with all this weird / annoying / intimidating / [??] math-y stuff ...
And maybe even start enjoying it
Math-y stuff is everywhere for the kinds of things (I'm assuming) we're all interested in —
-
laying out things on a webpage
-
receiving sensor data from an arduino
-
creating digital assets for fabrication
-
music & visuals
All these things involve dealing with numbers, and shaping and bending them
-
Small computer programs used for shading things [3d objects] — determining how the color interacts with light, choosing colors to create a texture. The stuff that can make a basic sphere in a 3d environment look like a marble vs a tennis ball vs a golf ball vs …
-
They generally need some kind of application that loads and runs them — eg, Processing, openFrameworks, Unity, TouchDesigner etc
-
But there's some standalone environments created to play with shaders in a more 2d way (like what we will use)
-
Programming with constraints can be a fun challenge, and people like to see how far they can push this
I'm a pixel, these are my coordinates, tell me what color I should be
INPUT: x and y location
OUTPUT: color (red, green, blue, alpha values ie RGBA)
No knowledge of other pixels, no knowledge of what has happened before, and all pixels want an answer to this at the same time
JUST SOME MATH FUNCTIONS MODIFYING THE INPUT NUMBERS TO PRODUCE THE OUTPUT NUMBERS
Think of color-by-number — by coloring each grid square in a specified color, an image emerges

Shaders are similar, except they use just math to determine the color, based on the location of the pixel

https://www.shadertoy.com/view/ld3Gz2

https://www.shadertoy.com/view/MdX3Rr
We're not going to learn how to make scenes like these.
We are going to write and play with very basic shaders -- since there is a very direct connection between the math and visuals, it is a great way to get more comfortable and enjoy math more
There are sample shaders in the GitHub repo — we're going to go through these one by one. They build off each other aside from a couple of exceptions.
Before jumping right into the files, we'll try to work through the logic for a given problem, without code
I would encourage you to try to write code and use the files as reference incase you get stuck, but if that seems really daunting, feel free to copy-paste code and tweak.
We're going to use the Book of Shaders editor : https://thebookofshaders.com/edit.php
note: there is a bug in the editor that doesn't let you access a URL to your shader. If you make something you love and don't want to lose it, be sure to hit "Export" > "Download File"
Let's copy paste this in to start with, just to get a sense of the editor and what we're dealing with
Click on any of the numbers in purple — you can slide the slider to change them, and everything is instant — which is what makes this particular editor great to use while learning
What is going on here?? What is this weird syntax?
Shaders use a language called GLSL (OpenGL Shading Language)
We are going to ignore these lines for now — just trust its something important that should be there
#ifdef GL_ES
precision mediump float;
#endif
Most of our shader code will go inside the main function, ie :
void main() {

   (most of our) SHADER CODE GOES HERE, INSIDE THESE BRACKETS

}
Depending on the platform or tool one is using to write a shader, some stuff will be given to us
gl_FragCoord is the INPUT variable, that holds the coordinates of the pixel we want to color
gl_FragColor is the OUPTUT variable, we must assign a color to this variable
There are different types of variables used in shaders
float is just a single number with a decimal point. the decimal point is VERY important, so we can't just write the number 10, we need to write 10.0
float myNumber = 10.0;
vec2, vec3 and vec4 are collections of numbers, more specifically, a collection of floats. vec2 is a collection of 2 numbers; vec3 a collection of 3 numbers; and vec4 is a collection of 4 numbers.
(There is no vec5 and beyond)
vec2 myVec = vec2(0.1, 0.2);
vec3 myVec = vec3(0.1, 0.2, 0.9);
vec4 myVec = vec4(0.0, 0.4, 0.6, 1.0);
There are a few different ways to pull out numbers from a collection
vec4 myVec = vec4(0.0, 0.4, 0.6, 1.0);
myVec.x // will return 0.0
myVec.y // will return 0.4
myVec.z // will return 0.6
myVec.w // will return 1.0
OR
vec4 myVec = vec4(0.0, 0.4, 0.6, 1.0);
myVec.r // will return 0.0
myVec.g // will return 0.4
myVec.b // will return 0.6
myVec.a // will return 1.0
We can use either of these methods interchangeably — both ways are provided so we can make it more obvious when we are talking about a position in space (xyzw) or a color (rgba)
A color is specified with 4 components — Red, Green, Blue and Alpha (transparency) — similar to what one might see in Photoshop or CSS or p5.js etc
When the red green and blue values are the same, the color is in grayscale
vec4 white = vec4(1.0, 1.0, 1.0, 1.0);
vec4 black = vec4(0.0, 0.0, 0.0, 1.0);
Depending on the tool or software we are using a shader with, we might already be provided with some uniform variables
uniform vec2 u_resolution;
A uniform variable is something that is accessible to ALL the pixels — its value stays the same regardless of the pixel's coordinates.
The program that runs the shader can provide the shader with as many uniform variables and values as needed.
This editor gives us 3 uniforms:
uniform vec2 u_resolution; // the pixel resolution of our canvas or drawing surface
uniform vec2 u_mouse; // the coordinates of the mouse
uniform float u_time; // the time elapsed (in seconds) since we loaded the page
And lastly, comment in GLSL are similar to other languages:
// this is a comment
You might have noticed that all these examples have values that are between 0 and 1. Why? And why is this great?
-
It makes everything much easier when there is a universally understood range. If we know position coordinates are always between 0 and 1, and color values are always between 0 and 1, we could directly base color on the position without worrying about our numbers being too big or too small.
-
Things are intuitive to understand, because we have a strong understanding of percentages… ie 0.1 is 10%, 0.5 is 50% etc
-
It allows for a lot of nifty math and logic related things, which we will see as we go on
The range between 0 and 1 is often referred to as normalized
The input, gl_FragCoord holds the actual coordinates of the pixel, in relation to the canvas. Ie, if the canvas is 100 x 100 pixels, gl_FragCoord will have a maximum x and y value of 100.
We want things to be in the 0 to 1 range however, so the first thing we do is normalize the coordinates, assigning the result to a new variable normPos
vec2 normPos = gl_FragCoord.xy/u_resolution.xy;
We then use the position on the x axis to help decide what color each pixel should be. When the pixel is close to the origin, the x value is closer to 0, and so there is very little red.
gl_FragColor = vec4(normPos.x, 0.0, 0.0, 1.0);
BOTTOM - LEFT corner. ie the pixel at the bottom left has coordinates of (0.0, 0.),
And the pixel at the TOP - RIGHT has coordinates (1.0, 1.0)
The comments in the code have some suggestions for things to try out — based on what we know so far, can we do all of these things?
    // try changing the RGB values
    // try making the gradient vertical instead of horizontal
    // try making the gradient grayscale
Can we describe in English the process we would use to generate this?

Remember 'shader way of thinking' : "I'm a little pixel at this X and Y position, what color should I be?"
Hint: GLSL has if-else statements etc
The code answer is in this file — but try writing it out!
Try clicking on one of the colors you have made (ie the vec4 ) — you should see a color-picker appear. The editor is smart in recognizing what kind of variable you are dealing with, and gives you the appropriate controls.
Can we create gradients instead of solid colors? Remember: The shader is executed for each pixel. Every pixel comes to the shader with different coordinates.
The same as the previous file, except with gradients and different colors.
By having one component of the color depend on the y coordinate of the pixel, we get vertical gradients.
    vec4 color1 = vec4(normPos.y, .2, 0.4, 1.0);
    vec4 color2 = vec4(1.0, normPos.y, 0.0, 1.0);
What if we wanted to draw a circle? Let's say a white circle with a black background...
What do we know about circles? How can we use this?
Remember: "I'm a little pixel that knows nothing except my location, please tell me what color to be"
We want a way to know if the pixel is inside or outside the circle, and we will decide its color based on this.
But first, let's decide some things about our circle — where is it positioned? How big is it?
In other words, where is its center? What is its radius?
We know we're dealing with coordinates that go from 0 to 1, let's have the circle's right at the center of our canvas --
vec2 center = vec2(0.5, 0.5);
We want a radius of a sensible size, so the circle fits in our canvas. So it has to be less than 0.5 :
float radius = 0.3;
Now whenever a pixel comes asking what color it should be, we simply need to see how far it is from the center — is it at a distance that is smaller or bigger than the radius?
GLSL provides us with many useful functions (that can be viewed here : https://thebookofshaders.com/glossary/)
One of these functions is distance — it takes two points and determines the Euclidean distance between them. We could give it 2 vec2 if we're dealing with 2D space, or 2 vec3 if we're dealing with 3D space, and so on. It returns a single value, representing the absolute distance (ie the distance is always a positive number)
float dist = distance(normPos, center);
Now all we need to do is check if this distance is less than our radius or not. If it is less, the pixel is inside the circle, and if it is bigger, it is outside the circle
if(dist < radius) {
    color = vec4(1.0,0.135,0.400,1.000);
}
Similar to what we did earlier, we can have our pixel color depend on the distance from the center — try it!
This is all great, but static images are pretty boring. What if wanted things to move?
We are provided with the uniform variable u_time
uniform float u_time;
Which gives us the time in seconds as a float — eg 1.23265252 seconds elapsed since we loaded the page
What if we tried making the color depend on u_time ?
What do we know about the range of u_time?
What do we know about the acceptable range for a color?
Will we run into any problems?
Let's try doing this :
color = vec4(u_time,0.135,0.400,1.000);
Since u_time is constantly increasing, and GLSL only cares for color values between 0 and 1, we don't see an animation — any color value above 1.0 is treated the same as 1.0
There's another GLSL function that we could use — fract
fract will give us the fractional portion of any number we give it --
fract(10.192) // returns .192
fract(67.192) // returns .192
Can we use this function to fix the earlier issues, and create some movement / animation ?
If we keep giving fract increasing values (such as u_time), what kind of pattern would we expect with the numbers we get back?
Since fract always gives us the fractional portion of a number, we know it's range, and it's the kind of range we like! 0 - 1
We can keep giving it increasing numbers, and it will repetitively keep returning numbers between 0 and 1, or rather, between 0 and 0.999999999999. (We'll look into other ways of using this repetitive property soon).
So by wrapping u_time in fract , we can be in a happy range again. Let's try this :
red = fract(u_time);
color = vec4(red, 0.135, 0.400, 1.000);
Can we bring our gradient back? An animated gradient… ?
What other piece of information do we want the color to depend on?
By having our color depend on the pixel's distance from the center, and on time, we get a nice animated gradient
float red = fract(dist + u_time);
color = vec4(red,0.135,0.400,1.000);
What if we wanted to change the direction of our animation? Does fract care if we give it positive or negative values?
We could simply subtract u_time instead :
float red = fract(dist - u_time);
color = vec4(red, 0.135,0.400,1.000);
fract has a repetitive nature. We could scale up our calculated distance, and fract will still be able to deal with it — what do we think will happen? Try multiplying dist with some biggish number, try different numbers…
float red = fract(dist*8.0 - u_time);
color = vec4(red,0.135,0.400,1.000);
-
Animate the position of the circle
-
Animate the size of the circle
-
Color the area outside the circle in an interesting way
-
Animate the area outside as well
Let's look at how we can use the repetitive nature of fract more, but first, let's try creating a diagonal gradient.
What bits of information can we use for this?
If a horizontal gradient depends on the x coordinate, and a vertical gradient depends on the y coordinate, what does a diagonal gradient depend on?
We want to consider both, the x and y values — we could do this in many different ways, but a simple way would be to average them
float avg = (normPos.x + normPos.y)/2.;
By averaging them, we are again guaranteed that the result is within the 0 to 1 range.
What if I wanted to repeat this diagonal gradient, and create 5 columns and 5 rows? ie, use this square as a tile...
How can I use some math and GLSL functions to bend and shape the values of the pixel's position to help me get a tiling effect?
Let's consider a few possible values that a pixel's x coordinate could be
0.1 0.2 0.3 0.4 0.5 0.6 0.7 0.8 0.9 1.0
Now let's multiply these values, or scale up, by the number of columns we want, ie by 5
0.1  0.2  0.3  0.4  0.5  0.6  0.7  0.8  0.9  1.0  --> multiply by 5
0.5  1.0  1.5  2.0  2.5  3.0  3.5  4.0  4.5  5.0
Now we have this range of 0 to 5, which is not ideal since we prefer a 0-1 range...
But what if we use our fract function again?
0.1  0.2  0.3  0.4  0.5  0.6  0.7  0.8  0.9  1.0  --> multiply by 5
0.5  1.0  1.5  2.0  2.5  3.0  3.5  4.0  4.5  5.0  --> pass these values to the fract() function
0.5  0.0  0.5  0.0  0.5  0.0  0.5  0.0  0.5  0.0
Now we're seeing some of that repetition that fract gives us… Why is this useful?
When we decided how to color the pixel, all we used were some two numbers between 0 and 1. The code does not know that those numbers were the exact x and y coordinates — it just uses the numbers, passes it through our math equations, calculates something and spits it out.
The fact that these numbers correspond visually to this 2 dimensional space is something that we see…
Remember how we normalized the pixel coordinate right in the beginning? We could have done some other weird math right there, and the code wouldn't care, it'll just take in the numbers we give it and do what we tell it to do with them...
So, what if we gave it these new values we just established?
Translating the previous steps into code, we have something like this:
vec2 normPos = gl_FragCoord.xy/u_resolution.xy;

// multiply by 5 since that's the number of rows and columns we want
vec2 scaledPos = normPos * 5.0;

// pass this scaled up position into the fract function
vec2 scaledFract = fract(scaledPos);
And now, let's calculate the average based on these values,
So instead of :
float avg = (normPos.x + normPos.y)/2.;
Lets do this:
float avg = (scaledFract.x + scaledFract.y)/2.;
And we have tiles! With just 2 additional lines of code! We could easily create more or less tiles by changing the scaling factor, on in other words, the number we initially multiplied with
What if we wanted to tile our circles?
Again, the code for our circle doesn't really care or know how we are perceiving the math it does — it was just reliant on everything being between this 0 and 1 range.
We have managed to take our initial input values that were between 0 and 1, and transform them to have it go 5 times between 0 and 1 — so we just need to do our circle calculations again with these new transformed values, and we'll be drawing the same thing 5 times over on each axis
We can just copy-past in our circle code after we have calculated our new scaledFract values, and then all we need to do is calculate our distance using this new value
float dist = distance(scaledFract, center);
We can leave our center and radius to be exactly the same values — because as we saw earlier, we transform the input values in such a way that we get the value of 0.5 occurring 5 times, instead of just once.
In other words, when we used normPos, there was only one pixel that would have the coordinates (0.5, 0.5) — at the center — and for all the other pixels, we calculated their distance from this single point.
With our transformation, there are 25 (5*5) pixels that will have scaledFract equalling to (0.5, 0.5)...
And likewise, there are 25 pixels that will have scaledFract equalling to (0.1, 0.1)… These 25 pixels will all result in the same calculation of dist
This can take a little while to settle in and feel comfortable, but once this idea sinks in, there is all kinds of things possible by just modifying and shaping the initial pixel coordinate values — or shaping the space
We have tiling, which is great, but the animation is identical for all of them, and the tiling would quickly get boring...
What if we could know which row or column we were dealing with, and animate them differently, or change some properties based on the row or column number… ?
Do we have enough information to do this?
Let's look at those values again:
0.1  0.2  0.3  0.4  0.5  0.6  0.7  0.8  0.9  1.0  --> multiply by 5
0.5  1.0  1.5  2.0  2.5  3.0  3.5  4.0  4.5  5.0  --> pass these values to the fract() function
0.5  0.0  0.5  0.0  0.5  0.0  0.5  0.0  0.5  0.0
fract just threw away one part of our number — but perhaps this could be useful?
There's a function that does the exact opposite of fract — it throws away the fractional part and keeps the whole-number part — which is a concept we're already familiar with : rounding down. In GLSL (and many other languages) this is the floor function.
0.1  0.2  0.3  0.4  0.5  0.6  0.7  0.8  0.9  1.0  --> multiply by 5
0.5  1.0  1.5  2.0  2.5  3.0  3.5  4.0  4.5  5.0  --> pass these values to the fract() function
0.0  1.0  1.0  2.0  2.0  3.0  4.0  4.0  4.0  0.0
This is essentially telling us the row/column number
Let's convert this to code too:
vec2 scaledPos = normPos * 5.;

//fractional portion
vec2 scaledFract = fract(scaledPos);

// whole number portion, which is like the index number or the row or column
vec2 scaledIndex = floor(scaledPos);
Now we can use this in our color calculation:
float red = fract(dist*4. + scaledIndex.x - u_time);
color = vec4( red, 0.135, 0.400, 1.000) ;
Though this doesn't work out quite as planned… why?
scaledIndex has values like 1.0 , 2.0 , 3.0 …. And we are shoving this inside a fract function … what would fract do to these values?
They all look the same to fract — all of them will return 0.0
If we multiply them by a small number though — something less that 1, we start to get different fractional parts for each of these numbers. Why less than 1? It's like taking a percentage of the number — if we multiply by 0.1, its the same as saying 10% of the number..
10% of 1.0 is 0.1 ; 10% of 2.0 is 0.2 … etc
With this we can have our columns animate at slightly different phases
float red = fract(dist*4. + scaledIndex.x*0.1 - u_time);
color = vec4( red, 0.135,0.400,1.000) ;
Not that kind of sin. The trignometry sine kind of sin...
We can understand sin and cos with circles and angles --
If we were draw a radius of a circle at a given angle from the center, and then keep increasing the angle, thereby traveling along the circumference of the circle,
The x coordinate of the circle gives us cos(angle), and the y coordinate gives us sin(angle)

https://thebookofshaders.com/05/sincos.gif
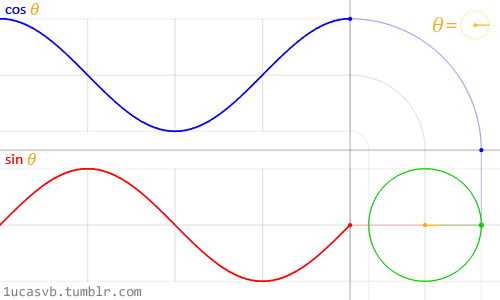
Ok but why do we care? sin and cos give us these nice repeating wave patterns, in the range of -1 to 1, for whatever we give it...
Remember how we had to find a way to transform u_time because the forever increasing nature of it wasn't useful to us?
We could pass a forever increasing value like u_time into sin or cos, and always get back values from -1 to 1, with this smooth wave-like change over time.
Let's animate our radius using sin
float radius = sin(u_time);
We could speed up the animation by scaling up time, ie multiplying it by a number bigger than 1 — making the input into sin change faster, and therefore making our animation faster..
But there's a problem here.. why does everything black out for a bit?
sin gives us back values between -1 and 1… what does a radius of -0.2 mean for a circle though?
We need a way to get back to our 0-1 range
This file has a map function on top. (Many tools and libraries give this to you as a built-in function, but GLSL does not have it)
float map(float value, float min1, float max1, float min2, float max2) {
  return min2 + (value - min1) * (max2 - min2) / (max1 - min1);
}
The map function asks us for a number, the current range the number is in, and the range we would like for it to be in — and does the math to shape our number to be in the desired range.
So we can use this to map out radius to a range of 0.1 - 0.6
radius = map(radius, -1.0, 1.0, 0.1, 0.6);
We could use our column and row numbers (or indices) to make the animation less uniform
float radius = sin(u_time * 3.0 + scaledIndex.x);
Unlike fract, the values of scaledIndex don't return the same value just because their have the same fractional part (1.0 , 2.0 , 3.0 etc..)
And unlike fract a sin function has a smooth easing effect, while increasing or decreasing … (recall the fract function will snap back to 0.0 after 0.99)
It can be very useful to look at these functions on a graphing tool and play around with them to see what kinds of animation they could lead to..
Using a tool like this https://www.desmos.com/calculator
Try plotting the following
- sin(x)
- sin(2x)
- sin( 3 * sin(x) )
One could come up with all kinds of weird equations like this, that could be used to animate things or choose a color.
Lets use one of these functions to create a more interesting animation:
float radius = sin( u_time*3. + sin(u_time*10.) + scaledIndex.x*0.2 );
We could use sin to animate the colors we use as well:
float g = map( sin(u_time*10. + dist), -1.0, 1.0, 0.0, 0.632);
float b = map( sin(u_time*12.0 + dist), -1.0, 1.0, 0.248, 0.320);
color = vec4(dist, g, b, 1.000) ;
And a whole lot else! We could bring back the animated gradients with fract, have the colors depend on the column and row indices, use the grapher to come up with even crazier animation curves.
- Upload your sketches here for our online glalery!
- The Book of Shaders https://thebookofshaders.com/ — read about noise and randomness, and a whole lot else
- Book of Shaders example page https://thebookofshaders.com/examples/ — click on any example to see and edit the code
- See more GLSL functions : https://thebookofshaders.com/glossary/
- Shadertoy https://www.shadertoy.com/ — be amazed and utterly confused by the code [note: the
uniformshave different names ] - Pixel Spirit Deck — https://twitter.com/pixelspiritdeck?lang=en
- Graphing -- https://www.desmos.com/calculator
- Awesome math videos on youtube -- https://www.youtube.com/channel/UCYO_jab_esuFRV4b17AJtAw