In this course, you will learn the basics of React.js through building a gradebook web application to manage assignments, students, and grades.
Tags: none
Congratulations on taking some of your first steps into full stack development.
So why did you decide to click and join this course? Ideally, you are a learner who:
- Understands HTML tags
- Understands classes and methods in JavaScript
- Understands Git and GitHub
If you understand the topics above, you can start learning modern frontend development with React.
So why do we learn React?
React has growing popularity in the tech industry because of its simplicity. With a simple knowledge of HTML and JavaScript, picking up React won't be too difficult.
We'll answer common questions like:
- How do you setup a React project?
- What is a component and how are they used?
- How do you add components?
- How is data passed to child components?
- How are state variables created and used?
- What is a callback function and how is it used to communicate data?
And when you're done you'll be able to:
- Setup a React project
- Add and use components
- Pass data to child components
- Use state variables
- Use callback functions to communicate data
We'll be building a gradebook for teachers!

- Completed source repository
- Completed Gradebook.
Before starting this course, we recommend:
- Completing the Introduction to GitHub Learning Lab with the option for working locally in the command line.
- Completing the Introduction to HTML Learning Lab
- This course uses node.js We'll install this as part of the first step in the course.
New developers, new GitHub users, users new to Git, students, teams
Hello and welcome!
Before starting this course, we recommend completing the Introduction to GitHub Learning Lab first with the option for working locally in the command line.
Let's take a look of what our React App looks like right now. We will go through our file structure which is a standard React setup. You will not be editing any files in this step, but the structure is important for future code references.

The package.json file is our roadmap of the app. It tells us the name of the app, the version, the different dependencies we need to run our app, and more.
The public/ directory contains our index.html file. The index.html file directs us to the rest of the web application that requires additional processing.
This is where most of your code will go. You'll notice we have App.jsx along with other jsx files. But, what is jsx? Think of jsx as a mix between html and javascript. We can write tags, functions, and classes. Take a look at the App.jsx file. Some of that contents might look familiar from html, like <div/> tags.
In this repository, we have two branches - main and changes. We will be working off of the changes branch. Let's go ahead and get started.
- Open your terminal
- If you're using a Windows operating system, we recommend downloading and using git bash as your terminal
- Change directories into a location where you want to keep this project
- Clone this repository:
git clone {{ repoUrl }} - Move into the repository's directory:
cd intro-react - Checkout to the
changesbranch:git checkout changes - Open the
intro-reactfolder in your favorite text editor - Check for Node installation:
node -v - Install Node if it is not installed
- In your repository folder, install the necessary packages:
npm install - Start the React Application:
npm start
Your browser should automatically open http://localhost:3000/, and you should see our barebones gradebook application.
You'll see that our app can't really do anything! All we have is three buttons! We are going to add all the functionality.
- Create a pull request to base
mainfromchangesbranch - Title your pull request
Changes
I'll respond with next steps in your pull request.
Awesome! You successfully opened a pull request!
In this Pull Request you will:
- Add components
- Pass data to child components
- Create and use state variables
- Use callback functions to communicate data
First, we'll learn about components.
Components are the building blocks of React apps. Think of components as different parts of the app. Each button is a component, each paragraph of text is a component, and so on. From html, you might recognize some of the built in components like <div /> and <li />. In React, we can create our own components! How cool is that?

In our solution, our assignments page looks like the above. The overall webpage is a component called App. Inside App there are other components like buttons, titles, and custom components that we can create (like the Assginments List).
Take a look at the following line in src/App.jsx.
class App extends React.ComponentThis line takes a component's properties to create a component named "App". In the render method of App, there are other components like <button/>. These components are child components because they are all a part of its parent, App.
Scroll down to add a header component.
Let's add a child component and give our app a header. At the end of the step, your app should like the following:

- In
src/App.jsx, replace line 92 with this header component:<h3 className="Box-title d-flex flex-justify-center">GradeBook</h3>
- Save your file
- To run the code, move inside the repository directory in your terminal and run
npm start - Exit the process in your terminal using
Ctrl + C - Stage, commit, and push your code to the
changesbranch:git add src/App.jsx git commit -m "add a header component" git push
It looks like you did not correctly replace line 92 with the correct h3 component in src/App.jsx.
Try again!
If you would like assistance troubleshooting the issue you are encountering, create a post on the [GitHub Community]({{ communityBoard }}) board. You might also want to search for your issue to see if other people have resolved it in the past.
Now, let's discuss how we can reuse the same component with different properties.
That might sound a little confusing, but let's take a look. Go to our final solution and add some assignments along with students. You might start to notice that both lists look the same, but with different values. In fact, both lists are the same component!
How do we pass different values to a component? We pass properties to the component, otherwise known as props.
Props are the input to components. Props allow us to reuse a component (like a list) in multiple places within our app.

Take a look at our final solution for our assignments and students page above. You'll see that they look similar. The lists used in the assignments and students pages use the same component, but with different values (props). Next, we'll learn to pass different values to the same components.
In this step, we will import the List component that we created for you into App.
- At the top of
src/App.jsx, replace line 3 with:import List from "./List";
- Save your file
- To run your code, move inside your repo folder in your terminal and run
npm start - Exit the process in your terminal using
Ctrl + C - Stage, commit, and push your changes to the
changesbranch:git add src/App.jsx git commit -m "import list component" git push
It looks like you did not import the List component into App.
Try again!
If you would like assistance troubleshooting the issue you are encountering, create a post on the [GitHub Community]({{ communityBoard }}) board. You might also want to search for your issue to see if other people have resolved it in the past.
Let's take a look at what the code between lines 52 and 61 means. When we click the Assignments button, the list for assignments is assigned to the variable tabChoice. tabChoice is rendered in the render method.
But how do we specialize the List for our assignments? This where our props come into play. We create properties such as placeholder, and currList. We then assign values to them.
Now that we imported the child component, let's use it in our code. At the end of this step, you should be able to click on the Assignments tab and render the following:
- In
src/App.jsx, uncomment the conditional statement between lines 52 and 61 - Save your changes
- To run your code, move inside your repo folder in your terminal and run
npm start - Exit the process in your terminal using
Ctrl + C - Stage, commit, and push your changes to the
changesbranch:git add src/App.jsx git commit -m "uncomment assignment rendering" git push
It looks like you didn't uncomment the proper line.
Please try again.
If you would like assistance troubleshooting the issue you are encountering, create a post on the [GitHub Community]({{ communityBoard }}) board. You might also want to search for your issue to see if other people have resolved it in the past.
What does the List component do with the information we just included? Adding this.props tells the component to look for the property that was passed to it.
To see, open the src/List.jsx file. In the render method, in our input tag, notice that we set our placeholder to this.props.placeholder. Then, at the bottom of our render method, we loop through our this.props.currList. This shows each item in the list that we pass.
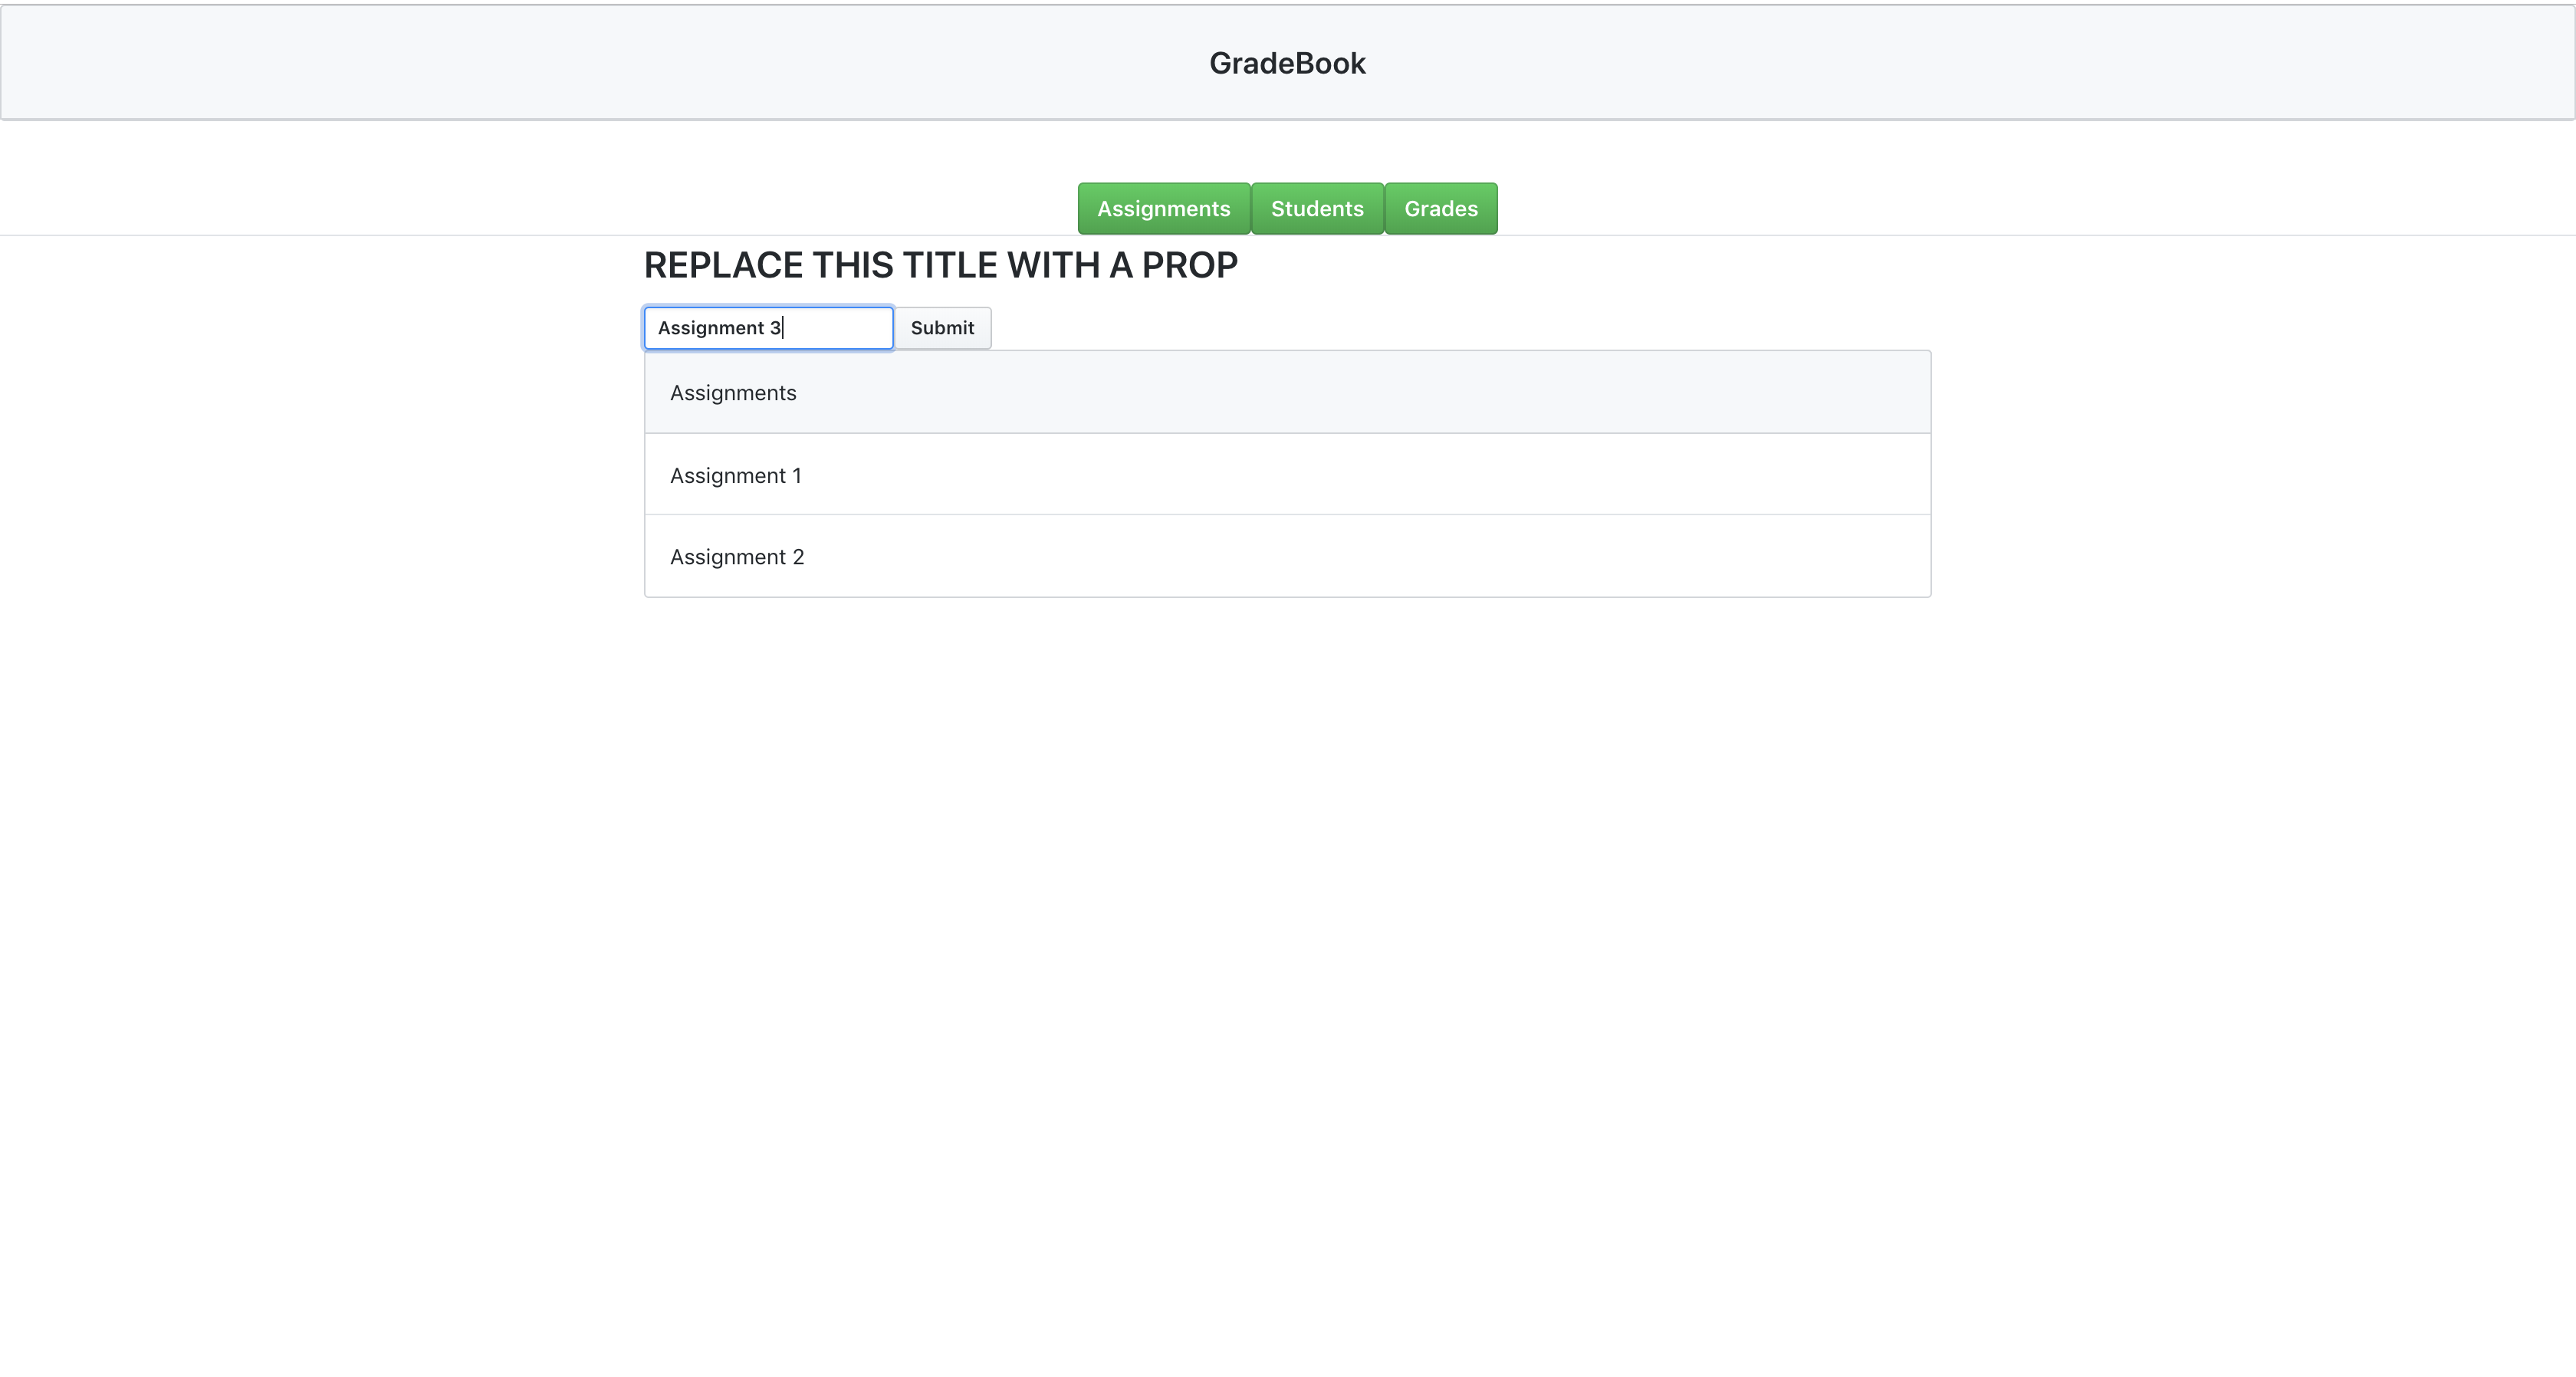
Let's go ahead and replace the current title with another prop.
- In
src/List.jsx, replace line 31 with{this.props.title} - Save your changes
- To run your code, move inside your repo folder in your terminal and run
npm start - Exit the process in your terminal using
Ctrl + C - Stage, commit, and push your changes to the
changesbranch:git add src/List.jsx git commit -m "use a prop for the header" git push
It looks like you did not replace the title with a prop in the correct place.
Ensure that:
- you're editing
src/List.jsx - you edit line 31
- your prop is within the
<p className="h2">and</p>tag.
Try again!
If you would like assistance troubleshooting the issue you are encountering, create a post on the [GitHub Community]({{ communityBoard }}) board. You might also want to search for your issue to see if other people have resolved it in the past.
So now, we learned how to pass data to components, but let's talk about the data itself.
There are two types of data: static data and dynamic data.
Static data doesn't change. Things like a title on a page or the name of a button would be static data.
Dynamic data, on the other hand, is data that does change. In our example, we can change it by adding an item to the list. Our list of assignments would also be considered dynamic data. But, how do we deal with dynamic data in React?
Scroll below to take a look in the code!
In React, we store dynamic data in state variables. Let's take a look at how we store state variables. In src/App.jsx, take a look at the constructor. You'll see that we declare our state variables using this.state = {.....}.
Currently, in App, we have three state variables:
buttonClicked- This stores which button was clicked. It is a state variable because the button that is clicked has the ability to change.assignments- This stores the list of assignments. It is a state variable because the list changes every time a new assignment is added.grades- This should store the grade for each student. However, we have no way to store students, so let's fix that!
Let's add a way to store students as a variable.
- On line 11 of
src/App.jsx, add a state variable namedstudents - Set
studentsequal to an empty array - Add a comma:
students: [], - Save your changes
- To run your code, move inside your repo folder in your terminal and run
npm start - Exit the process in your terminal using
Ctrl + C - Stage, commit, and push your changes to the
changesbranch:git add src/App.jsx git commit -m "add a state variable for students" git push
It looks like you did not add a students state variable.
Try again!
If you would like assistance troubleshooting the issue you are encountering, create a post on the [GitHub Community]({{ communityBoard }}) board. You might also want to search for your issue to see if other people have resolved it in the past.
How do we change data within a state variable?
Unfortunately, we can't just do this.state.studentsList = ..... to change data.
To set the state of a state variable we have to use the method, this.setState.
Take a look at the method on line 30 in src/App.jsx
When this method is called, it is adding assignmentName to our state variable assignments by setting the state of assignments to itself with the concatenation of assignmentName.
We are going to set some state in next steps.
Now that we see how it works with assignments, let's try it with students! We will create an addStudent method to add students the same way we add assignments.
- On line 37 of
src/App.jsx, create a method calledaddStudentbelow the commentaddStudentshould takestudentNameas a parameteraddStudentshould concatstudentNameto the end ofstudentslist that we created earlier- Hint: You can copy the same format for the
addAssignmentmethod
- Save your changes
- To run your code, move inside your repo folder in your terminal and run
npm start - Exit the process in your terminal using
Ctrl + C - Stage, commit, and push your changes to the
changesbranch:git add src/App.jsx git commit -m "create addStudent method" git push
It looks like you did not create an addStudent function with the parameter: studentName.
Try again!
If you would like assistance troubleshooting the issue you are encountering, create a post on the [GitHub Community]({{ communityBoard }}) board. You might also want to search for your issue to see if other people have resolved it in the past.
Since we created a method that changes a state variable, we have to bind it to our class. Then, when we call it, we know what method to reference.
- Uncomment line 18 of
src/App.jsxto bindaddStudenttoApp - Save your changes
- To run your code, move inside your repo folder in your terminal and run
npm start - Exit the process in your terminal using
Ctrl + C - Stage, commit, and push your changes to the
changesbranch:git add src/App.jsx git commit -m "bind addStudent to App" git push
It looks like you didn't uncomment the proper line.
Please try again.
If you would like assistance troubleshooting the issue you are encountering, create a post on the [GitHub Community]({{ communityBoard }}) board. You might also want to search for your issue to see if other people have resolved it in the past.
The last thing you need to know before you can call yourself a React Developer is callback functions. We said that we can pass data to the child with props, but what about passing data from the child to the parent?
With callback functions, we are able to do just that. We pass a function as a prop, and then the child component can call the function that was defined in the parent. Let's look at an example below.
So where exactly are those functions we created to set state getting called?
On line 63 in src/App.jsx, it looks like we pass the addAssignment function as a prop in this chunk of code.
Navigate to src/List.jsx and take a look at the code between lines 18 and 25 in src/List.jsx.
handleSubmit(event) {
    this.setState({
      value: ""
    });

    this.props.addFunction(this.state.value);
    event.preventDefault();
}
When the submit button is clicked, we call the addFunction with the value of our input box. For assignments, the addFunction references the this.addAssignment in App. So when we call this.props.addFunction, we are calling back to the parent component and using the parent's function.
Scroll below for next steps.
There are some issues with this code. We want to be modifying the students list, not the assignments list.
Let's change some props between lines 71 and 80 to render the correct components when we click Students.
- Uncomment the conditional statement between lines 65 and 75 of
src/App.jsx - On line 68, change the
placeholderprop to"Add Student..." - On line 69, change the
currListprop to{this.state.students} - On line 70, change the
addFunctionprop to{this.addStudent} - Save your changes
- To run your code, move inside your repo folder in your terminal and run
npm start - Exit the process in your terminal using
Ctrl + C - Stage, commit, and push your changes to the
changesbranch:git add src/App.jsx git commit -m "change props for students rendering" git push
It looks like you did not replace the props for student rendering.
Try again!
If you would like assistance troubleshooting the issue you are encountering, create a post on the [GitHub Community]({{ communityBoard }}) board. You might also want to search for your issue to see if other people have resolved it in the past.
Let's get our grades working! At the end of this activity, your code should now be able to add assignments, students, and grades.
- In the
src/App.jsxfile, uncomment the conditional statement between lines 77 and 86 for ourgradestab - Save your changes
- To run your code, move inside your repo folder in your terminal and run
npm start - Exit the process using
Ctrl + C - Stage, commit, and push your changes to the
changesbranch:git add src/App.jsx git commit -m "uncomment grades section" git push
It looks like you didn't uncomment the proper line.
Please try again.
If you would like assistance troubleshooting the issue you are encountering, create a post on the [GitHub Community]({{ communityBoard }}) board. You might also want to search for your issue to see if other people have resolved it in the past.
Now that we've approved the changes, it's time to merge the pull request.
- Click the
Merge Pull Requestbutton
Congratulations on finishing Introduction to React. To update your local course, use git checkout main and git pull.
Although this course certainly doesn't mean you are a React expert, we hope you have the tools to explore further content on your own. Here are some cool resources for further learning: